How to make a floating model boat
- Design and Make

- Nov 16, 2020
- 6 min read
Hi All, Welcome to my second blog. This time I thought I would look at how I designed and created my wooden model boat. This in itself was an extremely challenging project. Firstly, it was achieved in a very short time frame. Secondly, I was without a proper plane, so had to make do with a block plane!
If you’re interested in watching the accompanying video to this blog, please find the video on this page. I decided to use up some left-over oak scraps that I had from Surrey Timbers. I don’t use oak too often as I am not a huge fan of turning it and that is what I buy a lot of my wood for. However, I had almost the right amount of oak left over but did have to include one piece of maple just to have enough wood to cover the top as well. I did use some sapele for the cabin design! But it didn’t matter about all these mismatched colours as I would be painting it to improve its water resistance whilst in the sea as well as to help with it being bashed about a bit.
Moving onto the project now. I started out by printing a 2D boat design I liked. The one I chose was fairly simple with a subtle arc towards the bow, however I ended up shortening the boat due to some planing issues as discussed later on. I used a blue pen to mark the printed template onto the oak. The hull of the boat was made up from 3 pieces of oak, the bottom being 30mm and the other two about 20mm. I used the maple to create a lip or rim around the top of the hull. After the marking out I then clamped the boards down to my workbench with some f style clamps, these are my go-to clamp for all small projects as they’re quick and simple to use! One issue I discovered after cutting the boards was that I had failed to cut them to three different sizes. This wasn’t an issue as the two boards I had cut were the biggest size. To fix this I simply printed another two of the templates in a medium size and a small size and then re cut the boards in order to create 3 boards that ranged from large to medium to small. I used my Bosch jigsaw which made very short work of cutting the oak. If you do not have a jigsaw you could use a scroll saw, bandsaw, coping saw, fret saw or handsaw and just do lots of cuts and sand it until it matches the templates profile. In the largest board I cut a rectangular hole out of the back to create a stern section which would allow the cabin to sit nicely.
The video accompanying this project explains it in a better way as there is a visual aid. Next, I glued up the boards. I used gorilla wood glue, which is water resistant and outdoor rated. This method of model boat construction is known as bread and butter building. A relatively simple process where the wood acts as bread and the glue as butter. Essentially this creates a “sandwich” of glue and wood which is extremely strong. If you want to you could cut the middle of the boards out to leave a rim with a massive hole in the middle. As long as you use a thick piece for the base and leave the rest hollowed you can create a much lighter boat. I only cut part of the stern out in order to account for the weight of the cabin which would sit on the stern. This of course meant my boat weighed about 2.1kg although it floated very well due to the shape of the boat and the curvature to it. After applying a liberal coating of gorilla glue, I then used small f style lamps, G – clamps, a sash clamp and a large f style clamps to ensure the boat was held together very well. I left the clamps on for about an hour and then took them off. It was almost thirty degrees outside so the glue had almost completely dried.
I tested the boat in the water to ensure it floated bearing in mind this was before planing the boat. I knew I would need to add a rim though to stop water coming into the boat. Next, I put the boat into my engineer’s vice although an f style clamp would suffice for holding it but would be more challenging. I then moved onto the daunting task of planing the boat sides to make it look like a boat with curvature rather than three lumps of oak glued together! I did not have a number four of five plane so had to make do with a block plane which is a brilliant tool but is not intended for this amount of material removing. Although it coped surprisingly well but did ache my hands as it took a lot longer than it would have with a normal plane. However, after the intense amount of planing the boat looked awesome.

The next stage was the most tedious out of all of them purely down to the time, noise and dust. I taped my dust hose onto the belt sander and got to smoothing the boat where I had planed it, as there were bits where the plane didn’t quite reach. The final stage of the woodworking aspect was to start the cabin building section. This took me two attempts as at first, I was going to place the cabin at the bow which looked bizarre so instead I moved it to the stern, which was the most logical place for it to go. I started by using a 22mm piece of oak for the roof of the cabin, but this looked ridiculously bulky and oversized. I also was using two posts as the back and two posts at the front to support the roof which also looked odd. So instead I used two posts as the back of the cabin (these are the black posts at the stern of the boat) and then cut a window section from 10mm sapele, as well as cutting the roof again using 10mm sapele with my jigsaw. I then glued the roof to the window section with gorilla glue and used some small G-clamps to glue it up. The last part of woodworking to do was sand with my Bosch hand sander on the boat body and all the components just to remove the final plane marks and saw marks.
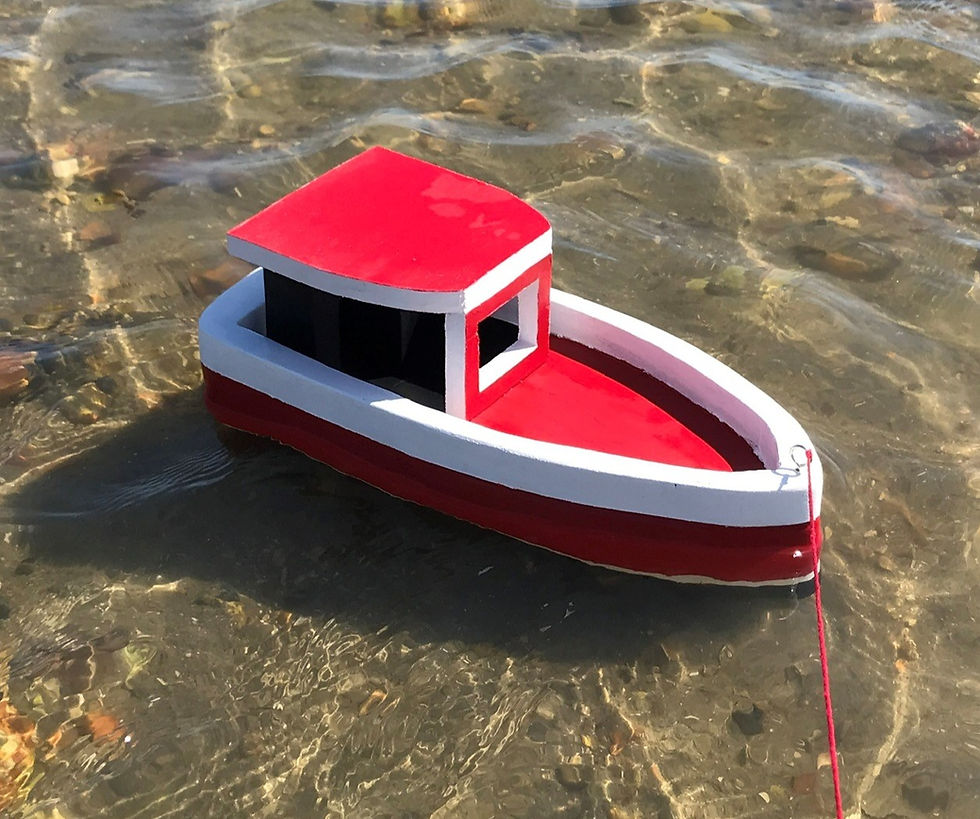
Finally! I was on to the part I was most looking forward to which might seem odd for a woodworking channel although I also enjoy painting from time to time. This stage was also a very long one, but I had great fun and it was hugely satisfying seeing the boat transform from essentially a paperweight to a beautiful floating boat. I found watching Jazza on YouTube to be hugely entertaining whilst paining and filming this stage. The first error I made on painting was forgetting to mask where I wanted the black paint to stop, although I quickly rectified this by masking it slightly higher up to get a consistent and smooth line. After waiting for this to dry (which was half the reason this took so long) I masked the black paint of and added a line of masking tape about 12mm above it to create a section for painting white. Adding a white line really makes the bright crimson stand out and adds a fantastic contrast to the black paint and crimson.

Afterwards I then essentially repeated the process of masking and created a crimson section which was the biggest amount of colour on the side. Lastly, I added a layer of white paint on the maple rim section to add a stopping point to the side of the boat and create a realistic boat impression. I did around 2-4 layers of paint to each colour. Afterwards I moved onto painting the inside of the boat and the cabin. For the cabin I painted the two posts one black and one white to see which I preferred, (it ended up being the black as it added a brilliant contrast) which made the boat pop! Next was the roof which I painted red with a black rim however I changed this to white as there was too much black in one place. Likewise, I painted the window red with a black outline on the rim but also changed this to white to create a better aesthetic to the boat. Last was to paint the cut out stern section black, the maple rim white like the outside, and the open bow in crimson red. That finished the painting. The final stages were mostly cosmetic enhancements and testing. I drilled a 0.5mm hole in the front of the maple rim at the bow and screwed the eye hook into it. I added a 30m string to it for towing it in the water. I used hot glue to hold the two black posts to the back of the stern section and hot glued the roof to these and the window to the open bow section.
Last was the test. The best bit! I decided to test it in the sea as I thought it would make it appear more realistic and make for some stunning photos. It floated beautifully even though it was very heavy. I used my GoPro to take some great photos of the boat, including some underwater ones. I hope you enjoyed reading this blog as much as I enjoyed writing it.
Thanks for reading!
James
November 2020
Comments